What’s so difficult about an attic insulation upgrade? Plenty.
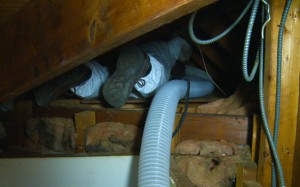
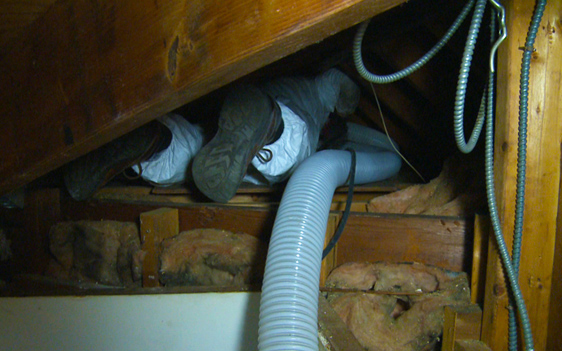
The Devil’s Triangle. Getting the details right in an attic insulation upgrade often means scrambling through dark, difficult spaces. This one earned its name for obvious reasons.
For just about any kind of job you might imagine, there are distinct differences between doing the work and doing the work REALLY WELL. This rule applies across every profession, from cleaning houses to managing stock portfolios. It’s worth mentioning in the field of home energy upgrades because consumers don’t always know what details define completed work as good, better or best. Homeowners can discern craftsmanship when new countertops or new flooring is installed, but blown cellulose insulation tends to look the same in any attic. So how can you tell the difference between an acceptable attic insulation upgrade and an exceptional one? I hope you know the answer by the time you reach the end of this blog.
Most attics are dirty, dark, cramped and complicated
I still remember one of the first attic insulation jobs I worked on –a modest ranch house with the usual drop-down stair in the hallway ceiling. It was about 100 degrees in the attic as we began to move old, dirty fiberglass insulation to make way for air-sealing work. Families of mice scurried along the joists as we disturbed their nests. I bumped my head numerous times on the shallow-pitched rafters, and discovered how itchy your skin can get when sweat attracts a coating of grime and glass fibers.
Because an unfinished attic isn’t a pleasant place to work, there’s a strong incentive for an insulation crew to speed through the job –get up, in and out as quickly as possible. But rushing through the job usually means that important details are missed, and that’s a problem. It turns out that attics are complicated. If you don’t believe me, check out the tasks described below. It’s easy for an insulation crew to ignore some of these important tasks because the deep blanket of blown insulation they install will make it impossible to tell if the work was done correctly –or at all.
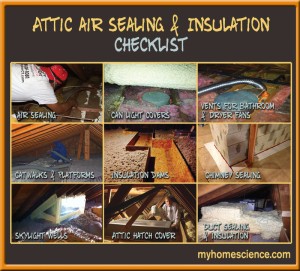
Attic insulation & air-sealing checklist
Complete air sealing. Air leaks between the conditioned space and an unfinished attic actually cause more problems than inadequate attic insulation. Some leaks are long and narrow: gaps between drywall and partition wall top plates. Some are round: holes made for recessed lights or for wiring that extends through wall framing. Some are huge: the 2-in.-wide airspace that extends around a chimney to separate the masonry from the framing. An experienced installer has the materials and know-how to seal all these leaks. Hopefully the installer also has a large measure of dedication, because you won’t get a second chance to air-seal correctly after the new insulation goes in.
Can light covers. By installing an airtight cover over every recessed light that extends into the attic, workers eliminate a major source of wintertime heat loss. When properly installed, can light covers make it possible for new attic insulation to be installed around and over the light fixture, maintaining continuous insulation coverage.
Proper venting of dryers & bathroom fans. These appliances can’t be allowed to dump damp, warm air into the attic, where it will cause mold and moisture damage. The contractor must make sure that airtight ductwork for vent fans and clothes dryers extends through the roof or gable end to exhaust moist air to the exterior.
Baffles between rafters. New insulation installed on the attic floor mustn’t block the ventilation pathway between the soffit vents and ridge or gable-end vents. To maintain this natural ventilation, plastic baffles are typically installed between rafters, extending from the soffit area to above the planned insulation level.
Catwalks & platforms. These features are often necessary to provide access to HVAC equipment or storage space. Unfortunately, many installers simply tack lengths of plywood in place over joists to provide a platform. Dr. Energy Saver has an innovative way to build catwalks & platforms, installing rigid foam beneath the platform or catwalk. This treatment maintains the thermal barrier that is otherwise interrupted.
Insulation dams. Short walls must often be installed to keep blown insulation from spilling onto platforms, catwalks and HVAC equipment. Some installers cobble together these barriers using cardboard or cotton fiber batts. Dams made from plywood or OSB sheathing look better, last longer and do a better job –a mark of craftsmanship.
Duct sealing. Ductwork is inherently leaky unless it has been sealed, and duct leaks can diminish HVAC system efficiency by 40%. Since many homes have ductwork in the attic, it’s important to have this ductwork sealed before the ducts are covered with new insulation.
Cover for attic hatch or drop-down stair. Air leakage around the access hatch to the attic needs to be blocked, ideally with a removable cover that also provides some insulation value. A good cover achieves these air-sealing and insulating goals, while also being easy to move out of the way when attic access is necessary.
Skylight wells. These rectangular openings are typically finished with ½-in.-thick wallboard, allowing plenty of heat to escape into the attic during winter months. To solve this problem, rigid foam insulation should be installed against the walls of the skylight well in the attic.
Giving credit for good craftsmanship
Let’s go back to my point about the difference between adequate and exceptional work. If you’ve read through the checklist above, you can appreciate the magnitude of work required to air-seal and insulate an attic THE RIGHT WAY. Contractors who brave difficult attic conditions to complete these tasks deserve special recognition. That’s why I’m dedicating this blog to Larry Janesky and the installation crew at Dr. Energy Saver Connecticut. These guys never stop trying to do a better and better job with home energy upgrades, and this dedication is especially evident in the time and attention they devote to attic upgrades.




Nice pictures and explanations! If I give appropriate credit/attribution, may I use them?
Please simply insert a link to the content on myHOMEscience.com.
Thanks for the tips! I’m currently working on air sealing my attic. Making sure that my attic is air sealed correctly before putting in the insulation is a really good point. It seems like a good idea to call a contractor who’s willing to spend as much time as needed to air seal my attic correctly.
What type of rigid foam board insulation do you use under platforms? It looks like a type of expanded metal. Would XPS or EPS foam be strong enough to support such a platform?