A great case can be made for upgrading your home’s insulation and for air-sealing gaps and cracks sooner rather than later. These improvements typically pay for themselves in 6 or 7 years — and then continue to generate savings for as long as you live in your home. If the price tag for a full energy upgrade is not in this year’s budget, however, here are 10 low-cost improvements that that will make your home a lot more comfortable this winter.
1. Use the passive solar heat
A sunroom or enclosed porch with a southern exposure can be used to collect a great deal of heat. Use a small fan or natural convection to move air through a doorway from solar-warmed rooms to adjacent interior spaces. Be sure to provide an opening for “return” air, such as a vent or an open window between the sunroom and the house, to ensure good air flow. A south-facing window can also be used to capture heat on sunny days. Open shades or drapes when you want solar gain on sunny days. Close them when you want to keep the heat inside at night. Cost: $0
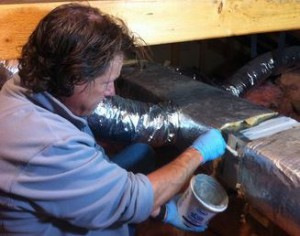
The price of a can of duct-sealing mastic will typically pay for itself in a single heating season.
2. Reduce air leaks at windows and doors
In winter, a surprising amount of cold air can leak into the house around window and door openings. This is largely due to the fact that the framed (or rough) opening of a window or door is bigger than actual size of the window or door. Seal and insulate this space by removing casement moldings and filling it with insulating foam sealant. The gap may be hidden by drywall or plaster, so you may have to make several holes to gain access it. Use a low-pressure-build foam sealant to avoid creating pressure on the window frame that could hinder its operation. Don’t use foam to fill the weight pocket of an old double-hung window unless you have already replaced the weights, pulleys, and cords with an alternative mechanism. Cost: $5 to $10 per window or door. (If this sounds like too much work, energy conservation companies like the
Dr. Energy Saver contractor in your area will perform air-sealing tasks for you.
3. Baseboard and crown moldings that run along exterior walls are also sources of cold air infiltration.
Apply a bead of “window and door” caulk along the trim/wallboard joint, and smooth it with a damp finger. Have some paper towels handy to wipe off the excess caulk. Cost: $20 to $40
4. Seal air leaks around wall and ceiling penetrations
Vent fans, recessed lights, and electric receptacles and switches on exterior walls can be sources of drafts and big-time energy losers. Applying caulk in the gap between the fixture or box and the drywall to stop air movement. Remove the cover plates and trim pieces before applying caulk. For electrical boxes, install a foam gasket under the cover plate before screwing it back in place. You’ll find a good video on sealing outlets at Dr. Energy Saver website. Cost: $30 to $50
5. Weather-strip windows and doors
The tiny gaps between window sash, jambs, headers, sills, and between the sash meeting rails all add up. So do the ones around exterior doors. Depending upon the number of doors and windows and the size of the gaps, the accumulative “hole” could be the size of a basketball! Installing weather-stripping is easy and inexpensive. Don’t forget the door sweep at exterior doors. Cost: $80 to $120
6. Seal ducts near air handler with mastic
Leaky, un-insulated ducts can reduce warm air flow where you need it. They can also waste huge amounts of energy. Use duct mastic to seal all duct joints and holes, especially those near the air handler. Cost: $20
7. Seal and insulate rim joists
A great deal of air leaks into your basement where the framing meets the masonry foundation. From there it contributes to cold floors and can easily infiltrate your living space via small cracks and gaps in flooring. Cut rigid foam board insulation to fit snuggly between joists at the rim, or band joist. Use caulk or a foam sealant to seal around the edges of the rigid foam boards. Cost: $150 to $250.
8. Keep registers and grilles unobstructed
Make sure that the supply and return registers and grilles in your forced-air HVAC system aren’t blocked or covered by rugs, furniture or furnishings. Blockages disrupt the balance of supply and return air, making the HVAC system operate inefficiently. They can also starve your furnace of air, causing the heat-exchanger to overheat and crack. Cost: $0
9. Ensure a balanced duct system
For a cozy, comfortable home, warm air must be able to circulate freely from the furnace to every room of the house, and then back again to the furnace. In a room where there is no return duct, especially one with a closed door, air pressure may build and resist the introduction of new warm air from the furnace. Leaving the door open or installing a jumper duct from the closed room to one with a return vent will help solve the problem. Watch this video on installing jumper ducts to better understand why comfort depends on a balanced duct system. Cost: $0 to $80
10. Seal your fireplace flue.
A typical fireplace is a major source of cold air drafts during the winter. Warm air goes up the chimney, even with the damper closed. Cold air gets sucked in. Stop this leakage (and save on heating costs) by installing a “chimney balloon” or “chimney pillow.” After inserting this tough plastic balloon into your flue, inflate it to seal the chimney. Remove it when you want to build a fire, and replace it after the flue has cooled completely. Cost: $70

